6.8 KiB
Getting Started
code-server is used by developers at Azure, Google, Reddit, and more to give them access to VS Code in the browser.
Quickstart Guide
NOTE: If you get stuck or need help, file an issue, tweet (@coderhq) or email.
This document pertains to Coder specific implementations of VS Code. For documentation on how to use VS Code itself, please refer to the official documentation for VS Code
It takes just a few minutes to get your own self-hosted server running. If you've got a machine running macOS, Windows, or Linux, you're ready to start the binary which listens on port 8443 by default.
- Visit the releases page and download the latest cli for your operating system
- Double click the executable to run in the current directory
- Copy the password that appears in the cli

- In your browser navigate to
localhost:8443 - Paste the password from the cli into the login window

NOTE: Be careful with your password as sharing it will grant those users access to your server's file system
Things To Know
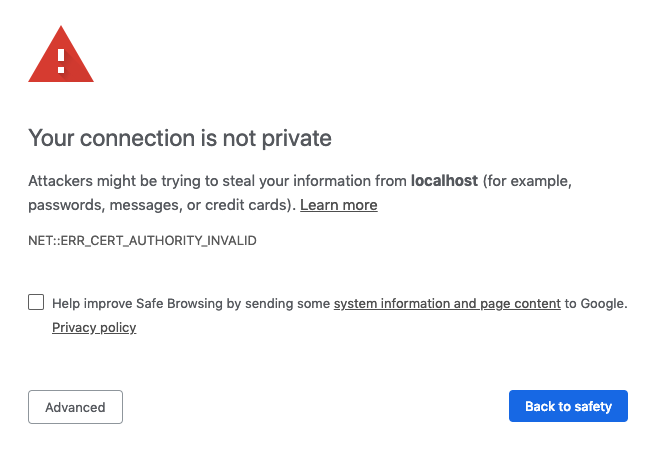
- When you visit the IP for your code-server instance, you will be greeted with a page similar to the following screenshot. Code-server is using a self-signed SSL certificate for easy setup. In Chrome/Chromium, click "Advanced" then click "proceed anyway". In Firefox, click Advanced, then Add Exception, then finally Confirm Security Exception.

Usage
code-server --helpcode-server can be ran with a number of arguments to customize your working directory, host, port, and SSL certificate.
Usage: code-server [options]

Run VS Code on a remote server.

Options:
  -V, --version                         output the version number
  --cert <value>
  --cert-key <value>
  -e, --extensions-dir <dir>            Override the main default path for user extensions.
  --extra-extensions-dir [dir]          Path to an extra user extension directory (repeatable). (default: [])
  --extra-builtin-extensions-dir [dir]  Path to an extra built-in extension directory (repeatable). (default: [])
  -d, --user-data-dir <dir>             Specifies the directory that user data is kept in, useful when running as root.
  -h, --host <value>                    Customize the hostname. (default: "0.0.0.0")
  -o, --open                            Open in the browser on startup.
  -p, --port <number>                   Port to bind on. (default: 8443)
  -N, --no-auth                         Start without requiring authentication.
  -H, --allow-http                      Allow http connections.
  --disable-telemetry                   Disables ALL telemetry.
  --socket <value>                      Listen on a UNIX socket. Host and port will be ignored when set.
  --trust-proxy                         Trust the X-Forwarded-For header, useful when using a reverse proxy.
  --install-extension <value>           Install an extension by its ID.
  -h, --help                            output usage information
Data Directory
Use code-server -d (path/to/directory) or code-server --user-data-dir=(path/to/directory), excluding the parentheses to specify the root folder that VS Code will start in.
Host
By default, code-server will use 0.0.0.0 as its address. This can be changed by using code-server -h or code-server --host= followed by the address you want to use.
Example:
code-server -h 127.0.0.1
Open
You can have the server automatically open the VS Code in your browser on startup by using the code-server -o or code-server --open flags
Port
By default, code-server will use 8443 as its port. This can be changed by using code-server -p or code-server --port= followed by the port you want to use.
Example:
code-server -p 9000
Telemetry
Disable all telemetry with code-server --disable-telemetry.
Cert and Cert Key
To encrypt the traffic between the browser and server use code-server --cert= followed by the path to your .cer file. Additionally, you can use certificate keys with code-server --cert-key followed by the path to your .key file.
Example (certificate and key):
code-server --cert /etc/letsencrypt/live/example.com/fullchain.cer --cert-key /etc/letsencrypt/live/example.com/fullchain.keyExample (if you are using Letsencrypt or similar):code-server --cert /etc/letsencrypt/live/example.com/fullchain.pem --cert-key /etc/letsencrypt/live/example.com/privkey.key
To ensure the connection between you and your server is encrypted view our guide on securing your setup
Nginx Reverse Proxy
Nginx is for reverse proxy. Below is a virtual host example that works with code-server. Please also pass --allow-http. You can also use certbot by EFF to get a ssl certificates for free.
server {
  listen 80;
  listen [::]:80;
  server_name code.example.com code.example.org;
    location / {
       proxy_pass http://localhost:8443/;
       proxy_set_header Upgrade $http_upgrade;
       proxy_set_header Connection upgrade;
       proxy_set_header Accept-Encoding gzip;
    }
 }
Apache Reverse Proxy
Example of https virtualhost configuration for Apache as a reverse proxy. Please also pass --allow-http on code-server startup to allow the proxy to connect.
<VirtualHost *:80>
  ServerName code.example.com

  RewriteEngine On
  RewriteCond %{HTTP:Upgrade} =websocket [NC]
  RewriteRule /(.*)           ws://localhost:8443/$1 [P,L]
  RewriteCond %{HTTP:Upgrade} !=websocket [NC]
  RewriteRule /(.*)           http://localhost:8443/$1 [P,L]

  ProxyRequests off

  RequestHeader set X-Forwarded-Proto https
  RequestHeader set X-Forwarded-Port 443

  ProxyPass / http://localhost:8443/ nocanon
  ProxyPassReverse / http://localhost:8443/

</VirtualHost>
Important: For more details about Apache reverse proxy configuration checkout the documentation - especially the Securing your Server section
Help
Use code-server --help to view the usage for the CLI. This is also shown at the beginning of this section.